Hi and Welcome,
Stampin up has so much to offer. One of the things I love is to learn and within the stampin’ up! community we all learn from each other. So today I experimented. I made a matchbook filled with sticky note pad inside. For xmas I was brought the stampin’ air dry clay and molds and the paper piercing tool and stencils. So todays task I set myself was to make something that utilsed both of these plus more.
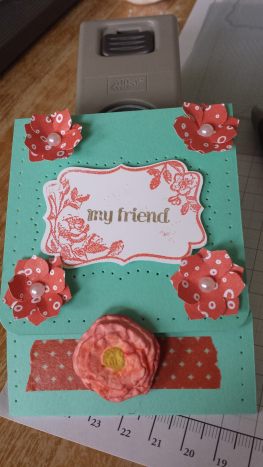
Here is the match book I made :-
Unfortunately it isn’t a great photo due to the light however you can see what I have done.
Materials used:-
- Coastal Cabana Card Stock
- Whisper White Card Stock
- Simply Pressed Clay
- Blossom Mould
- Piercing tool
- Piercing Mat
- Stampin’ Trimmer
- Stampin score tool
- Glue dots
- Envelope Punch Board
- Epic Day Washi Tape
- Calypso Coral Blendability pens
- Hello Honey Stampin’ Marker
- Confetti Celebration DSP
- Calypso Coral embossing powder
- Versa mark ink pad
- Stampin heat tool
- Four Frames stamp set
- Rhinestone Basic Jewels
- Petite petal punch
Instructions to make
- Cut your chosen coloured card stock to 9 1/4 inches by 3 1/8 inch using the stampin up trimmer. (Card stock is better for this project as thicker but you could use dsp if you wished.
- Using the Stampin Score tool place your card across your board. Score at 3 3/8″, 3 3/4″ and 7 3/4″
- Using the bone folder fold all your creases.
- Using emboss buddy rub your whisper white card stock.
- Now stamp your chosen stamp in the versa mark ink, it will appear almost invisible. I used the Four Frames Stamp set.
- Making sure you have some paper underneath your stamped design sprinkle calypso coral emboss powder over the design, then tap off the excess.
- Using the heat tool, heat the embossed powder until it bubbles, or melts and adheres.
- This design can then be punched out using the decorative label punch.
- On your card base, the top piece of card using the piercing tool piece your chosen shape – mine being the decorative label using the paper piercer and the piercing mat.
- If you wish pierce around the edges – templates used included in the essentials piercing pack.
- Mount the stamped design in the centre of your shaped pierced design using the stampin dimensions.
- I punched petite petals from the confetti celebration DSP. Each flower is two layered. Adhere together using glue dots.
- Place flower on the pierce mat and using the score tool push in the centre to give it a more 3-D effect.
- Place these on your design with the glue dots.
- Next I ripped some of the Epic Day Washi Tape and placed along the bottom.
- Using the Simply Pressed Clay, push into the desired mold – I used the large flower from the blossom set.
- Take out of the mold and leave to dry.
- Once dry using the Calpso coral blend ability pens colour the outer edges in the darker shade, them bringing the lighter shades in to give it the multicoloured effect. Leave to dry.
- Mount to the bottom of the card using glue dots.
- Attach the sticky pad inside – and you have completed your project.
All of these products are available from my stampin’ up! Shop and remember we have a promotion where you can earn FREE product on every £45 you spend.
It would be lovely to see your finished designs to see your makes so feel free to add yours to the comments.
